In order to reconstruct the image on the detectors for all pixels in the FoV (25 degree field, with a 2 degree angular resolution) for a single pointing a set of 19 equations with 156 unknowns would need to be solved. This is impossible, and the only way to increase the number of equations and make the system solvable is to use more pointings. Thus, in order to solve the problem of background determination an appropriate dithering strategy has to be adopted for every observation.
The imaging performance of SPI depends on the dithering pattern that is used. In general the higher the number of pointings, the better the imaging. It was shown that, when using the hexagonal dither pattern the reconstructed point source response function shows very strong side lobes at distances of 10 to 20 from the center. Therefore this mode should only be used for isolated point sources and is not really suitable for imaging. The side lobes are still present, but significantly less with the 5 by 5 dither pattern (about 50% of the hexagonal case). To remove these side lobes, which will cause artifacts in reconstructed images, the only possibility is to enlarge the imaged area by using many more pointings (i.e. many dithering patterns).
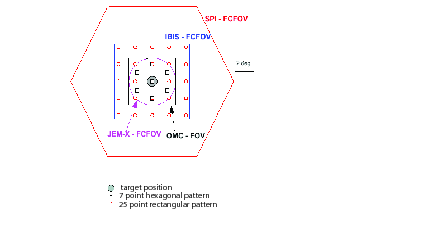
A schematic view of possible dithering patterns is shown in Figure 3. A different dithering strategy can be adopted depending on the circumstances. For SPI, a 5 by 5 dithering pattern with 2 spacing around the target source is usually the best choice. In the case that there is only a bright, isolated source in the FoV, an hexagonal dithering pattern, with one pointing centered on the source and six pointings at distances of 2 from it is also acceptable. Both dithering patterns use a dwell time of the order of 30 minutes per pointing.